I used to spend too long deciding what to wear, even when my closet was full.
The problem wasn't about having fewer clothes—it was about organization, visibility, and getting better guidance when choosing outfits.
So I built a fashion web app that helps users organize their wardrobe, get outfit suggestions, evaluate shopping decisions, and improve recommendations over time through feedback.
This article walks through what the app does, how I built it, the technical decisions I made, and the challenges that shaped the final product.
Table of Contents
- Table of Contents
- What the App Does
- Why I Built It
- Tech Stack
- Product Walkthrough (What Users See)
- How I Built It
- Challenges I Faced
- What I Learned
- What I Want to Improve Next
- Future Improvements
- Conclusion
What the App Does
The app combines six core capabilities:
- Wardrobe management
- Outfit recommendations
- Shopping suggestions
- Discard recommendations
- Feedback and usage tracking
- Secure multi-user accounts
Users upload clothing items, explore suggested outfits, and mark recommendations as helpful or not. They can also rate outfits and track whether items are worn, kept, or discarded.
That feedback becomes structured data for improving future recommendations.
Why I Built It
I wanted to create something personal and useful. Many fashion apps look polished but don't help with everyday decisions. My goal was to make wardrobe management easier and outfit selection less overwhelming.
The app needed to do three things well:
- store each user's wardrobe data
- personalize recommendations
- learn from user feedback over time
That feedback loop makes the app feel adaptive rather than static.
Tech Stack
Here are the tools I used:
- Frontend: React + Vite
- Backend: FastAPI
- Database: SQLite (local development)
- Background jobs: Celery + Redis
- Authentication: JWT (access + refresh token flow)
- Deployment support: Docker and GitHub Codespaces
This setup gave me a modular architecture: fast frontend iteration, clean API boundaries, and room to evolve recommendations separately from the UI.
Product Walkthrough (What Users See)
1. Onboarding and Account Setup
Users register, verify their email, and complete profile basics including body shape, height, weight, and style preferences.
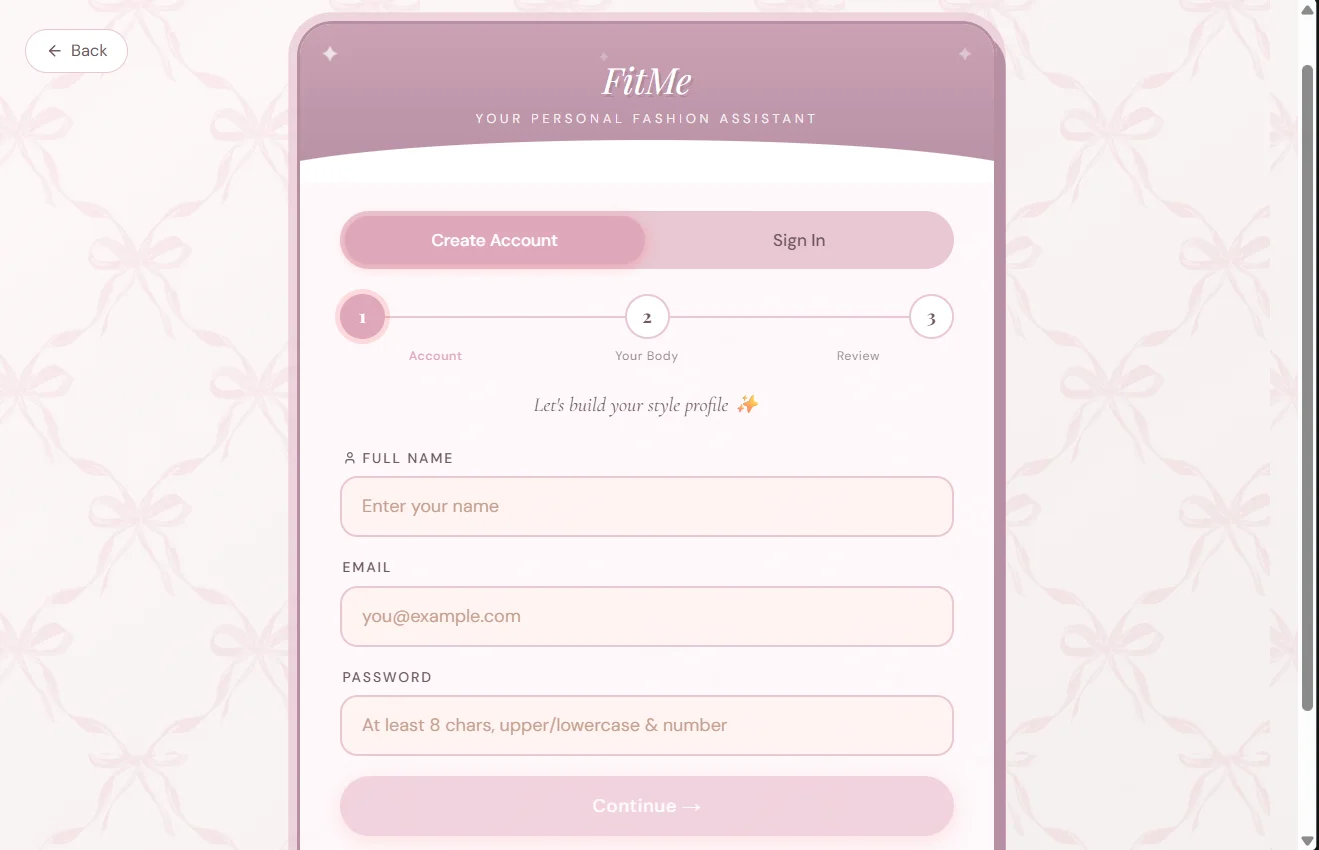
Each account is isolated, so wardrobe history and recommendations stay user-specific.
2. Wardrobe Upload
Users upload clothing images, which the app analyzes automatically.
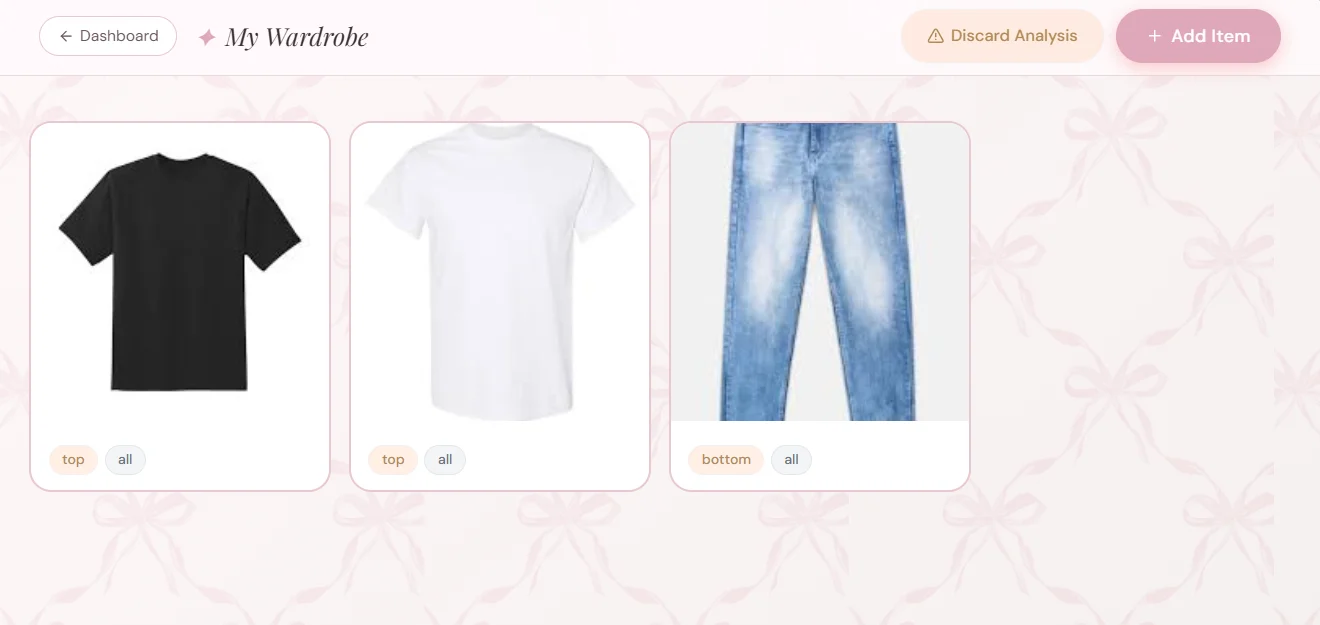
Image analysis labels each item by category, dominant color, secondary color, and pattern, making it searchable for recommendations.
3. Outfit Recommendations
Users request recommendations and rate the results.
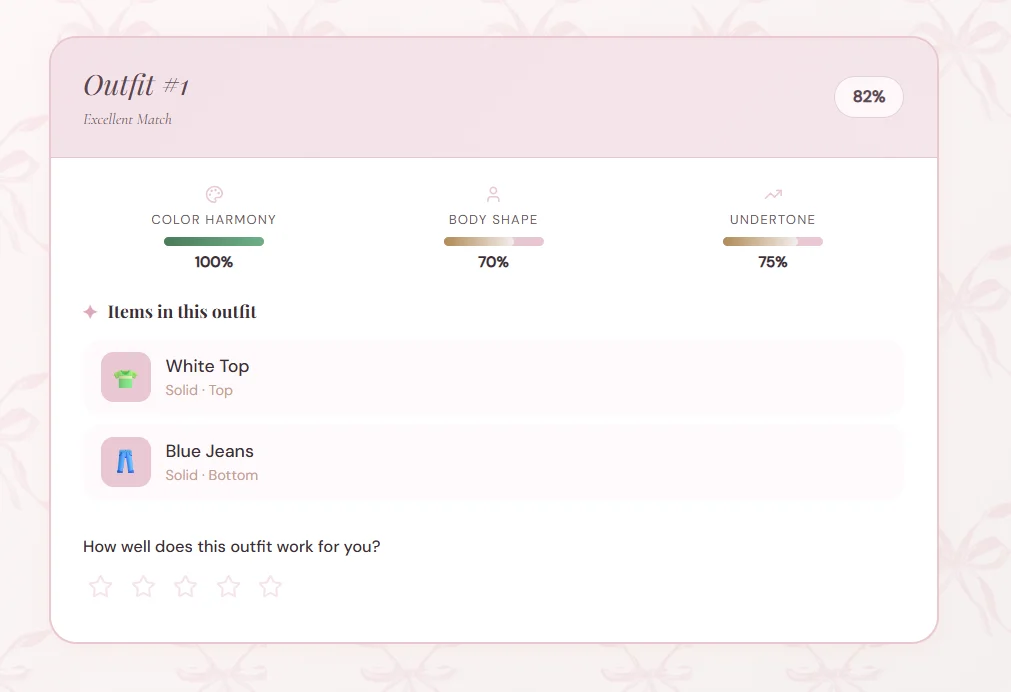
The dashboard displays ranked outfit cards with feedback and rating actions. Recommendations are ranked using a weighted scoring model.
4. Shopping and Discard Assistants
The app evaluates new items against existing wardrobe data and flags low-value items that may be worth removing.
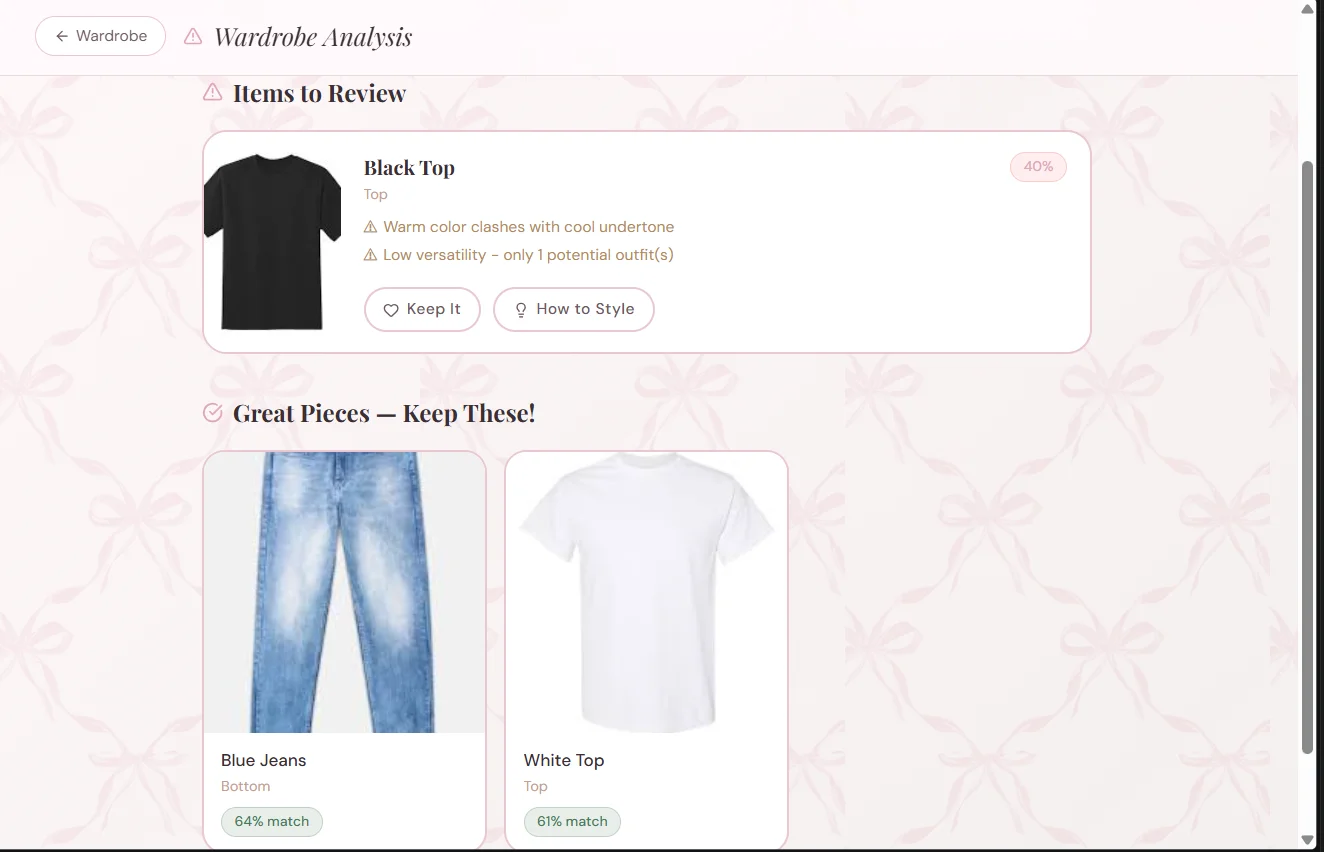
Each recommendation includes a score, written reasoning, and styling guidance—not just a binary keep-or-discard decision.
How I Built It
1. Frontend Setup (React + Vite)
I chose React + Vite for fast iteration and clean component structure.
The frontend is organized into feature areas: onboarding, wardrobe management, outfits, shopping, and discard suggestions. API calls live in a service layer, keeping UI components focused on rendering and interaction.
Here's the API service pattern used throughout the app:
export async function getOutfitRecommendations(userId, params = {}) {
const query = new URLSearchParams(params).toString();
const url = `/users/\({userId}/outfits/recommend\){query ? `?${query}` : ""}`;
const response = await fetch(url, {
headers: {
Authorization: `Bearer ${localStorage.getItem("access_token")}`,
},
});
if (!response.ok) {
throw new Error("Failed to fetch outfit recommendations");
}
return response.json();
}
What's happening here:
URLSearchParamsbuilds optional query strings likeoccasion,season, orlimit- The request path is user-scoped, isolating each user's recommendations
- The
Authorizationheader sends the access token for backend verification - Response validation happens before parsing, so the UI can surface useful errors
This pattern kept the frontend simple and reusable as API calls grew.
2. Backend Architecture with FastAPI
The backend is organized around clear route groups:
- auth routes for register, login, refresh, logout, and sessions
- user analysis routes
- wardrobe CRUD routes
- recommendation routes for outfits, shopping, and discard analysis
- feedback routes for ratings and helpfulness signals
One critical design choice: enforcing ownership checks on user-scoped resources. This prevents one user from accessing another user's wardrobe or feedback data.
Here's how a typical recommendation route works:
@app.get("/users/{user_id}/outfits/recommend")
def recommend_outfits(user_id: int, occasion: str | None = None, season: str | None = None, limit: int = 10):
user = get_user_or_404(user_id)
wardrobe_items = get_user_wardrobe(user_id)
if len(wardrobe_items) < 2:
raise HTTPException(status_code=400, detail="Not enough wardrobe items")
recommendations = outfit_generator.generate_outfit_recommendations(
wardrobe_items=wardrobe_items,
body_shape=user.body_shape,
undertone=user.undertone,
occasion=occasion,
season=season,
top_k=limit,
)
return {"user_id": user_id, "recommendations": recommendations}
Breaking this down:
get_user_or_404loads profile data needed for personalizationget_user_wardrobefetches only the current user's items- The minimum wardrobe check prevents recommendation logic from running on incomplete data
generate_outfit_recommendationshandles scoring logic separately, keeping the route handler small and testable- The response returns results in a shape the frontend can consume directly
This separation kept the API layer readable while recommendation logic stayed isolated in its own service.
3. Recommendation Logic
I started with deterministic rules before introducing heavy ML. This made behavior easier to debug and explain.
The outfit recommender scores combinations using weighted signals:
$$\text{outfit score} = 0.4 \cdot \text{color harmony} + 0.4 \cdot \text{body-shape fit} + 0.2 \cdot \text{undertone fit}$$
Here's how the scoring works in code:
def score_outfit(combo, user_context):
color_score = color_harmony.score(combo)
shape_score = body_shape_rules.score(combo, user_context.body_shape)
undertone_score = undertone_rules.score(combo, user_context.undertone)
total = 0.4 * color_score + 0.4 * shape_score + 0.2 * undertone_score
return round(total, 3)
The logic is straightforward:
- color harmony makes the outfit visually coherent
- body-shape scoring makes the outfit flattering
- undertone scoring ensures colors work with the user's profile
I used a similar structure for discard recommendations and shopping suggestions, with different factors and thresholds.
4. Authentication and Secure Multi-user Design
Security was critical for this build.
I implemented:
- short-lived access tokens
- refresh tokens with JTI tracking
- token rotation on refresh
session revocation (single session and all sessions)
email verification and password reset flows
Here's how the refresh-token lifecycle works in practice. This simplified example highlights the key control points:
def refresh_access_token(refresh_token: str):
payload = decode_jwt(refresh_token)
jti = payload["jti"]
token_record = db.get_refresh_token(jti)
if not token_record or token_record.revoked:
raise AuthError("Invalid refresh token")
new_refresh, new_jti = issue_refresh_token(payload["sub"])
token_record.revoked = True
token_record.replaced_by_jti = new_jti
new_access = issue_access_token(payload["sub"])
return {"access_token": new_access, "refresh_token": new_refresh}
The function decodes the refresh token and looks up its JTI in the database. If the token has been revoked or reused, the request fails—this prevents replay attacks. When validation passes, the system rotates the refresh token rather than reusing it, then issues a fresh access token. The user stays logged in without interruption, and I maintain server-side control over logout behavior across multiple devices.
5. Background Jobs for Long-running Operations
Image analysis—classifying clothing, extracting colors, estimating body-shape signals—can be computationally expensive. To keep the request path responsive, I integrated Celery with Redis for background task processing.
This setup supports two modes: synchronous processing for local development and queued processing for heavier workloads. The tradeoff keeps the developer experience simple while preventing expensive operations from blocking the main application thread.
6. Data Model and Feedback Capture
A recommendation system improves only when it captures meaningful signals. I built dedicated feedback tables for outfit ratings (1-5 scale with optional comments), recommendation helpfulness votes, and item usage actions (worn, kept, or discarded).
Here's one of those models:
class RecommendationFeedback(Base):
__tablename__ = "recommendation_feedback"
id = Column(Integer, primary_key=True)
user_id = Column(Integer, ForeignKey("users.id"), nullable=False)
recommendation_type = Column(String(50), nullable=False)
recommendation_id = Column(Integer, nullable=False)
helpful = Column(Boolean, nullable=False)
created_at = Column(DateTime, default=datetime.utcnow)
The user_id ties feedback to the person who provided it. recommendation_type distinguishes between outfits, shopping suggestions, and discard recommendations. recommendation_id identifies the specific recommendation, while helpful captures the user's direct response. The created_at timestamp enables trend analysis over time.
This structure gives the app a foundation for learning, though the feedback-to-model-update loop remains a future enhancement.
Challenges I Faced
1. Image-heavy endpoints were slower than I wanted
The analyze and wardrobe upload flows handled multiple operations at once: image validation, classification, color extraction, storage, and database writes. Initially, this made requests feel sluggish.
I bounded concurrent image jobs to prevent the system from attempting too much simultaneously, separated slower operations into background processing, and used load testing to identify which endpoints were genuinely expensive. Heavy image requests stopped competing as aggressively. Rather than allowing many expensive tasks to pile up in the same request cycle, I limited active work and pushed slower operations into the queue.
Bounding concurrency prevented CPU-bound task overload. Moving expensive work into async jobs kept the main request/response cycle responsive. Load testing provided evidence-based tuning rather than guesswork. I changed the execution model so expensive analysis couldn't block every subsequent request.
2. JWT sessions needed real server-side control
A basic JWT implementation is straightforward, but it becomes less useful without session revocation or clean multi-device management.
I stored refresh tokens in the database, tracked token JTI values, rotated refresh tokens during session refresh, and added endpoints for logging out a single session or all sessions. The critical shift was moving from "token exists, therefore session is valid" to "token exists, matches the database record, and hasn't been revoked or replaced." This gave the server authority to invalidate old sessions immediately.
Server-side token tracking enabled revocation. Rotation reduced token reuse risk. Session management became visible to users, making the app feel more trustworthy. This is what made logout-all and multi-device management function properly rather than serving as cosmetic UI actions.
3. User data isolation had to be explicit
In a multi-user app, one account must never accidentally access another account's wardrobe data.
I added ownership checks to user-scoped routes, filtered all wardrobe and feedback queries by user_id, and used encrypted image storage instead of exposing raw paths. Every route asks: "Does this user own the resource they're trying to access?" If not, the request stops immediately.
Ownership checks made data access rules explicit. User-filtered queries prevented accidental cross-account reads. Encrypted storage improved privacy and reduced the risk of direct image data exposure. This combination kept wardrobe data, feedback history, and images properly separated across accounts.
4. Docker made the project easier to share, but only after the stack was organized
The app includes the frontend, backend, Redis, Celery worker, and Celery Beat. The first challenge was making setup feel reproducible rather than fragile.
I defined the stack in Docker Compose, documented required environment variables, and kept the dev stack aligned with production architecture. This removed setup ambiguity. Instead of asking contributors to manually figure out how components fit together, the stack describes itself.
Docker let contributors start the project with fewer manual steps. Clear environment configuration reduced setup mistakes. Matching the stack to the architecture made the app easier to understand and test. This mattered because the app depends on several moving parts, and the simplest way to make the project approachable was to make startup behavior predictable.
What I Learned
Small features become significantly more valuable when they work together. Feedback data is one of the strongest signals for improving recommendations. Clean data modeling matters considerably when multiple users are involved. Docker and clear setup instructions make a project much easier for others to try.
I also learned that a project doesn't need to be massive to be useful. A focused app that solves one problem well can still feel meaningful.
What I Want to Improve Next
Integrate feedback directly into ranking updates
Add visual analytics for recommendation quality trends
Improve mobile UX parity
Deploy with persistent cloud storage and production database defaults
Provide a public demo mode for easier evaluation
Conclusion
This project started as a personal frustration and evolved into a full web application with authentication, wardrobe storage, recommendation logic, and feedback infrastructure. The most rewarding part was seeing how practical software decisions—not just flashy UI—can help people make everyday choices faster.
If you want to explore or run the project, check out the repo. You can try the flows and share feedback. I'd especially value input on recommendation quality, UX clarity, and what features would make this genuinely useful in daily life.